Breazy's Guide to a Rebuildable Atomizer for Beginners
11th Aug 2021

An atomizer is one of the most essential components of a vape mod. It produces the vapor that you’ll be familiar with and allows you to experience the flavors of your vape juice. That means it’s crucial to ensure your atomizer is exactly right. When you buy a commercially available vape mod, you’ll be getting an atomizer that’s pre-made to suit that mod.
Rebuildable Atomizer for Beginners
What you can do instead is build your own. That way, it will have resistance levels perfectly tailored to your needs, and you can trust the results because you built it with your own hands and tools. It’s a detailed process, but that’s why we’ve written this guide. We’ll show you how to create a rebuildable atomizer for beginners. We’ll also be covering:
- - A rebuildable tank atomizer for beginners
- - A rebuildable dripping atomizer for beginners
- - The best rebuildable atomizer for beginners
Creating a Rebuildable Atomizer for Beginners
In this section, we’ll walk you through creating your rebuildable atomizer. We’ll start with a look at the tools you need to build it, and then reveal the steps you’ll need to take to end up with a perfect atomizer for your vaping needs.
The Tools You’ll Need to Make a Rebuildable Atomizer
When you build your atomizer, there are a few items you need to buy in advance. This can make the cost higher upfront, but you’ll still save money compared to buying a pre-made atomizer.
The most important item that you’ll need is the atomizer itself. You can get a dripping atomizer, tank atomizer, or atomizer head. We’ll talk more about these later in the article.
The most important item after the atomizer is the vape wires. There are many you can choose from, and there are three most common types. These are stainless steel, nichrome, and kanthal. The most common out of these three is kanthal. If you want more control over temperature, then stainless steel is best. If you want more power modes, then nichrome is the better alternative.
Another recommended item is an ohm meter. This can help you to understand what level of resistance you’ve got in the coils you’ve made. The key to remember when using one of these meters is that if your mod and the meter give very different readings, one of the two is at fault.
Other tools that you should get include:
- - Cotton
- - A coil jig
- - Wire cutters
- - Scissors
- - Ceramic tweezers
- - Screwdrivers
- - Angled tweezers
The cotton can be from any source that you prefer, but organic cotton will have the highest quality. Wire cutters are better if they’re smaller and angled. You’ll be using them to cut wires and remove coil leads once they’re installed.
Ceramic and angled tweezers are necessary because they help you with any finer work, like placing components. With the screwdrivers, you should get a whole set just to be sure they’ll fit all the screws. Finally, the scissors you get should be sharp.
You may want to consider getting some kits that you can use if you’d like to be a little less hands-on. There are many you can investigate, and they act like a shortcut, reducing the time and energy you need to create a rebuildable atomizer for beginners.
How to Build An Atomizer
The first thing you’ll need to do is prepare for construction. That means gathering all of the components and tools that we’ve mentioned and laying them out neatly. You should wash your atomizer, and then attach it to your meter. After that, take out any screws and put them to one side.
You’ll now move on to building the coil itself. Take some vape wire and wrap it around the coil jig. Enough wire for 7 wraps should do it. Thread the wire through the jig and then twist it to ensure the wire is wrapped around it. You might want to watch a video to help you with this part.
After you’ve made the coil, you’ll need to install it. You’ll want to start by putting the wire leads into the atomizer, shortening them if needed. Once they’re inside, put the screws back in and then cut away any wire that’s left behind. After that, make sure you’re left with a straight coil and take the bar out.
Now you’re almost at the end of the process, but there are still a few more steps to keep in mind. You’ll need to test your coil to ensure that it gets warm enough throughout. It’s no good if only one part of it heats up.
This is where your ohm meter comes in. If you’ve got tweezers, you’ll need them too, but only if they’re ceramic. Start by heating the coil until it glows red, and strum them as it pulses. That will take away any hotspots that are present.
After all this, you’re almost done. All you have to do now is wait for everything to cool down. Your rebuildable atomizer will then be ready for wicking.
Wicking Your Rebuildable Atomizer
With the cotton you laid out earlier, find the most fluffy parts and rip them off. Roll it all up in your fingers and then pass it across your coil, pulling it as you do so. You should then floss it, to make sure that it fits just right. Then use tweezers to brush it.
This fluffs it up even more and pulls off any remaining cotton that isn’t needed. After that, put your cotton into the atomizer, and fold it in carefully. Finally, drip some vape juice on the cotton, and you’ll be ready to go.
A Rebuildable Tank Atomizer for Beginners
One of the two types of rebuildable atomizers you can get is tank atomizers. These are very popular, and most vapers know about them. The difference is that these atomizers have what’s called a build deck inside. You don’t need to add mods, as the tank is already a part of the design. You can get smaller or larger ones depending on your needs. Some go as high as 30mL, whereas others only reach 2mL.
A Rebuildable Dripper Atomizer for Beginners
These are the most simplistic atomizers that you’ll find, which makes them perfect for beginners. They come with a top cap and build deck, but unlike tank atomizers, they have no tank. You’ll have to get that separately. You also have to wick these after each use, but a new approach called squonking makes this easier. A box mod for squonking allows you to squeeze a small bottle to wick the cotton.
A Rebuildable Atomizer for Beginners
The third type of atomizer you can get is simply called a rebuildable atomizer. It’s simply an atomizer head, and you can use it in certain tanks instead of the coil that comes with them. You’ll have to buy them separately, and they’re not as good as the other types. But if you’ve got a tank already, then it’s convenient to get one of these instead.
The Best Rebuildable Atomizer for Beginners
We found three atomizers that are worth a look if you’re just starting, and we’ve given an overview of each one in this section. You can click on the link in the subheading to be taken directly to a page where you can find out more information.
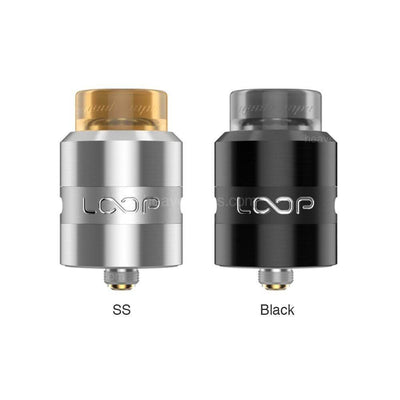
Geek Vape Loop 24MM RDA
This is a highly-rated dripping atomizer from Geek Vape, and it stands out because its deck is shaped like a W. This concentrates the air that comes from your coils. The Loop also dissipates heat very efficiently so you won’t have a cooldown time. The flavors from it taste great too.
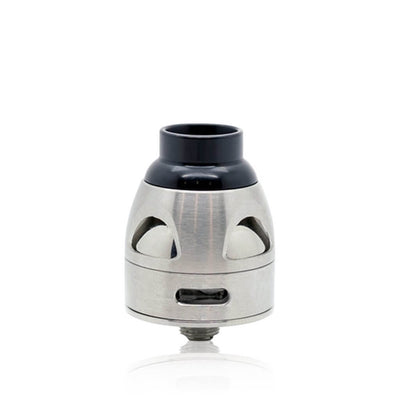
Asmodus Galatek 24mm RDA
This is one of the cheapest dripping atomizers that you’ll find, with a current price of just $6.99. It’s also very versatile and has a deep well for your vape juice. That means you won’t have to worry about any spillages. It’s also made of stainless steel, which gives it a stylish appearance.
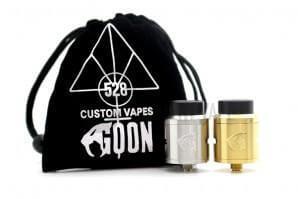
GOON V1.5 RDA (Clamp Two Post) - 528 Custom Vapes
This is an updated version of the GOON RDA, which gives it a bigger build deck as well as improved airflow. It comes with a small carrying bag, which is a nice touch. Like the Galatek we just looked at, this one is also made of stainless steel. But at $24.49 at the time of writing, it doesn’t come cheap.
Conclusion
We’ve now shown you the tools you need to create the best rebuildable atomizer for beginners, and walked you through the process of doing so step-by-step. Once you start practicing, you’ll keep improving until it becomes second nature.
We’ve given as much information as possible, but make sure to look at some videos if you need more help. We’ve also covered the definitions of a rebuildable dripping atomizer for beginners, a rebuildable tank atomizer for beginners, and a rebuildable atomizer head.
If you’d like to learn more about and purchase high-quality vape products and accessories, please visit Breazy.com.